Friday, December 30, 2011

Retirement Countdown using My Memories Software


My aunt has worked for the Genealogy Department at the church for about 25 years now.
And she is retiring the last day of February!
She is so excited!
So to help her count down the days, I made her this fun little countdown.
You'll have to use your imagination a little, seeing as it was one of those last minute Christmas presents, and I didn't get a chance to take a picture of the finished product.
I used the My Memories Software, which I am giving away this week!  Go here to get entered...
Go ahead.  Go now.  I'll wait!...
...
You back?
Good!
Back to the countdown.  I just whipped up the design and then printed it out and glued it to a couple of pieces of cardboard.  I wrapped the edges of the cardboard with jute and stuck some magnets to the back.
For the numbers, I used rubber cement to create a notepad that can easily be peeled off.
I backed it with a thin piece of cardboard to make it more sturdy.
That's it!  Easy Peasy.  The longest part was waiting for the glue to dry.

Thursday, December 29, 2011

Happy Holidays...and my first GIVEAWAY!!!!

Happy Holidays friends!  It is still TECHNICALLY the holidays, right?

I have been in Crazy Crafting Elf mode for the last month, and feel like I can finally come up for air.
The sad thing is, I didn't get pictures taken of most of my crafts. :(
But I did make my own, very simple, holiday cards and wanted to share them with you.

I made the cards with a digital scrapbooking software that asked me to review their product.  Because the holidays are always so crazy busy, I didn't get to my Christmas cards until the 23rd!  Talk about a time crunch!  Anyway, so I wanted something simple, and fun, and best of all, EASY!
My Memories came to my rescue!
I just uploaded this photo and enlarged it to fill the page.  Then I added a strip of green, using the color matching tool to match the green in the shirts.  Then all I had to do was add some fun embellishments.  How easy is that?  And the best part?  All the embellishments I used were FREE!  That's right.  My Memories has a section that is entirely free!  Just click on them to download them to your computer.  They also have so many fun papers, embellishments, overlays, and packs to purchase that I could probably put a serious dent in Daddy Did It's paycheck!
Another awesome feature:  They have a wish list.
This is what mine looks like so far
Look at those prices!  Totally affordable, right???
And this is just the stuff that I stumbled across working on Christmas presents, mind you.
Now that I have sent my Elf Self back to the North Pole, I am looking forward to really digging into this site and checking one MAJOR project off my To-Do-List.
I have been waiting until I had a digital scrapbooking program to make a scrapbook for each year since I got married.  As of yesterday, I am exactly 7 1/2 years behind!  Yikes!  I gotta get to work!

So without any further ado, drum roll please!
I am so excited to announce that My Memories will be sponsoring my very first giveaway!


My Memories will give one lucky friend of mine a free download of their My Memories Suite Software!  That's a $39.97 Value!

There are 5 ways to enter.
2.  Be a follower of Momma Did It

** Make sure you leave a separate comment for each entry!
I will draw a winner on January 6th, so you have a few days to wander around and look at all the awesome designs, then hurry on back here and get entered!

Don't want to wait until the new year to get started on the fun?
I don't blame you!
My Memories has generously offered a discount to all Momma Did It friends.
Just enter this code at check out:   STMMMS1157
Make sure you copy & paste to avoid typos.
This code will get you $10 off the software, plus $10 to use toward anything else!  Awesome!

Monday, November 21, 2011

Before the Blog: Clay Ornaments

Raise your hand if you are SUPER excited that they holidays are finally here! We had our Thanksgiving dinner with my side of the family yesterday since we will be spending the actual holiday with Daddy Did It's side this year.  I was in  charge, so you know there will be some fun posts to come on  that.  But today I wanted to share something that I did a few years ago, before the blog.

I have been working on this year's ornaments, and that got me thinking about some ornaments we made in 2007.  It was a total impromptu thing that started with a Play Doh themed birthday party:

 Since the birthday was less than a month before Christmas and I had Decking the Halls on the brain, I made some clay for the kids to make ornaments out of.
(I don't remember what recipe I used.  But I'm sure you can google salt dough or modeling clay recipes and get a huge list!)
 But I made way, WAY too much.
So we I spent the night cutting out letters, shapes, anything the girls' hearts desired.
And Daddy Did It and my little brother ran to the Home Depot and got some Oops! cans of paint.
 We ended up with green, purple, and red.  Interesting color pallet, I know.
But it turned out so cute!
The topper was three gingerbread men tied together.
Of course, we also added the ones that the kids made and colored themselves!
My fave is the one that Kota (the 3rd Birthday Girl) did of her daddy.
Can you spot him?  He's wearing a yellow shirt and blue jeans.  :)
It certainly wasn't our most glamorous tree ever,
but we had a blast making every last piece as a family.
(sorry about the less than stellar pix.  My camera was on it's last leg.  If I remember correctly, it died on Christmas day! :( )

This year, I am working on some book page ornaments.  I hope I get them done in time!
Are you making your ornaments this year?

Wednesday, November 2, 2011

A Rainbow Fairy

I know it's a little late to post Halloween costumes, but what little girl really needs an excuse to dress up any day of the year, right?

So, even though I'm a slacker, I present The Rainbow Fairy!
This kid has had it in her head for a very long time that she was going to be a rainbow fairy for Halloween this year.
How could I say no to this sweet little girl?
So I bought 16 yards of tulle and got to sewing...
and sewing...
And sewing.
Whew!  8 layers later, we had a beautiful tutu that won't tangle like the tie tutus!
I was so mad last year that I kept having to comb out Kota's & Chey's tutus!
Am I the only one that has this problem?
Anyway, the tutu took me a while, but I love how it turned out!
And I still have about a half a yard of each color left in case I get around to making a skirt for a certain doll Santa MAY be bringing for this little girl for Christmas.
For the shirt, I wanted something that she could wear to school with jeans or wear with the tutu after Halloween, so we went with a simple glittery rainbow.
I bought the wings at Dollar Tree and added rainbow colored glitter to tie it in with the rest of the outfit.
I think Charly's favorite part was the hair pretty.  It kind of looks like a clown, but I love it, too!
It adds a certain amount of whimsy to the costume, don't you think?
Add a little glitter rainbow to her cheek
And rainbow finger nails
And this little fairy was ready to fly off on an adventure
I love it when my kids start a sentence with "Pretend..."  I love watching their little imaginations at work!
This was the most excited she has ever been for one of Mommy's photo shoots.
She kept saying, "Mommy, get a picture of me doing this..."
So what were your kids for Halloween?
Will their costumes be going in the dress up box?

UndertheTableandDreaming


Tuesday To Do FEatured

Monday, October 24, 2011

Pin & Spin: Drama


It's time for a fun new, shall we call it, Series, here on Momma Did It!  I can tell you are so excited, so let me tell you more about it!
I am TOTALLY addicted to the fun new site, Pinterest.  Best. Idea. EVER!  However, I have been a little bit of a hoarder of great ideas lately, and needed to put some of those ideas to work.  So I decided to share all of my new found fun with you lovely readers.

I'm calling it Pin & Spin.  I will pick a project from one of my MANY Pinterest Boards, put my spin on it, and share it with all of you.  Of course I will be sharing the link to the original idea, too.  I wouldn't come up with half of my ideas without a little encouragement from all you other amazing crafters out there.  Gotta give credit where credit is due!

So, for my first Pin & Spin, I give you this adorable shirt.  First the original:
t-shirt drama

And now, my Spin on it:
My version  is a little more girly.
It was a gift for my adorable niece that just turned 3.
She is so full of energy and making her momma run ragged to keep up with her.
I thought it was pretty fitting.
What do you think?
Oh, why don't you come join in on the fun?
You can follow my boards by going here.

Wednesday, October 19, 2011

Holiday Centerpieces

Last year, on my birthday to be exact, our Relief Society had its annual Holiday Dinner, with a twist.  Our R.S. President didn't want to have it too close to Christmas, so she wanted us to combine Thanksgiving, Christmas, and New Year's into one big party.  Lucky me, I got to come up with the centerpieces.  Initially, I was so excited!  What's more fun than decorating for a bunch of ladies?  But as the days wore on, I was coming up short.  Six tables, two for each holiday. The theme was "Holiday Traditions."  It took me a while, but I finally pulled it off.
For Thanksgiving, I used a leaf wreath with a cake plate in the center.  On the cake plate was a cornucopia filled with fall flowers, and on each side was a cute little turkey candle holder.
The second Thanksgiving table was all about baking for the holidays.  Rolling pin, mini cookie cutters, potato masher, and a ceramic pie were sprinkled with cinnamon sticks and cloves.  It smelled so good!  I added some height with a cookie tin under the cloth.
My family always decorates for Christmas the day after Thanksgiving, so of course, I had to use some of my favorite decorations for a Christmas table.  This one got a lot of "oohs and ahhhs."  There is just something so classic and festive about red and gold.
The other Christmas table holds a small portion of my mom's Nutcracker collection.  Every year for as long as I can remember, my mom has received at least one nutcracker for Christmas.  She finally had to tell us NO MORE!  because she ran out of room to store them all!
New Year's was the hardest one to come up with.  There is the traditional champagne, I mean sparking cider (this is an LDS get together.  We aren't big drinkers ;) ), but what to do for the second table?
I thought, what do we do each year to kill the time before midnight?
Of course!  Play games.
So I rounded up some classics and topped it with a fun timer that I received as a gift when I was in the second grade....a long, Long, LONG time ago.
To jazz it up a little more, I spelt out festive words with the Scrabble tiles.
On a side note, is it weird that I have no idea how to play Scrabble?  This game sat around our house for 20+ years and I have never seen it opened until this event!

So what about you?  Do you have fun Holiday traditions?  How will you adorn you tables in the coming Holiday Season?  I'd love to hear what you have up your sleeve! 

Monday, October 17, 2011

Got a Minute? Felt Flower

What do you do when you daughter reminds you that she has a birthday party in 2 hours, your bank account is flashing a big fat $0.00, and you have absolutely nothing on hand?  First you go into panic mode.  Then your sweet, unassuming 5 year old tells you, "It's okay, Mommy.  We can just whip her up a pretty dress real quick." After you laugh hysterically at her sweet innocence (let's just say I'm not the quickest sewer in the world), you decide that you could whip up a quick hair pretty!
 For those of you reading this that know my kids.  Yes, I am aware that this isn't the 5 year old.  Charly felt more like chasing imaginary bugs around the yard directing the photo shoot than actually being in front of the camera.

I just eye balled it and cut out 3 sizes of petals from felt.  I hot glued them to a felt circle with a clip. And glued a flower rhinestone to the middle.
 We added some glitter to give it a little more character.
 Speaking of character, look at that pose!
I love how it turned out so much that I have plans to make a whole rainbow of felt flowers for the girls!  Can't wait!


Friday, October 7, 2011

Tangled Party

All right folks.  This is it.  The piece-de-resistance.  The grand finale.  The whole Shebang!
 If you missed the post about the banner and flower balloons, go here.
 And if you're dying to know about the birthday girl's outfit, go here.
Oh, and P.S., I like the outfit a lot better with the leggings!

And now onto the fun and food!

 To entertain the kids while we finished with the food (thanks Mom!  You're the best!),
I made a giant Rapunzel braid from yarn (remember the leftovers in the banner?) for the kids to play tug-o-war with.
This thing was a labor of love, I tell ya!
 Note to self (and anyone else braving this project) #1:  DO NOT enlist the help of your 4 year old, 2 year old, and two cats to make a mile long (slightly exaggerated for the dramatic) braid.  Talk about TANGLED!  Geez!
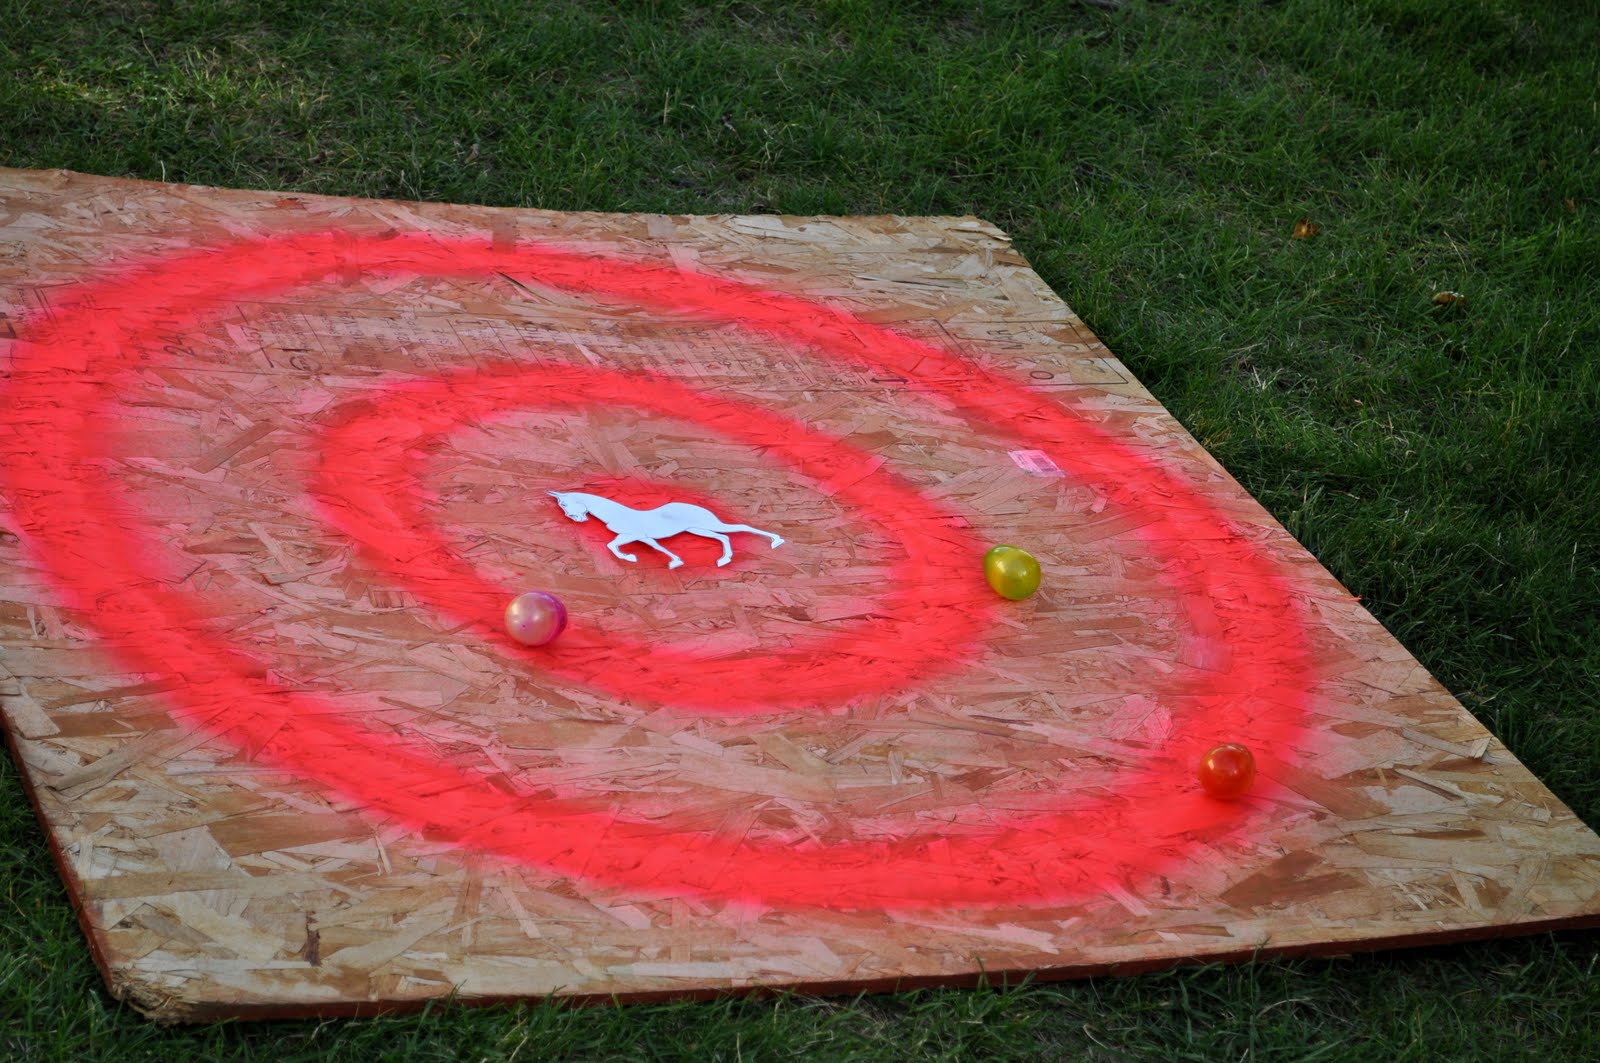
 Next up was a pretty funny activity, if I do say so myself.
Another great quote from the movie was my inspiration.
They are about to fling Flynn over a wall.
 My sister-in-law (same one from the balloon flowers) built this catapult for a school project last year.
She let me use it to "Fling Flynn"
 The kids each got an egg with their name on it
 And shot it at the target where Maximus was waiting.
(If you haven't seen the movie...you don't get this.  Max is waiting on the wall for Flynn.  Got it?)
 The winner got a candy bar for being such a sure shot.
 Note to self #2:  DO NOT make red punch for birthdays!  What was I thinking???
Which leads me to the part you have all been waiting for...
.
..
.
Drum Roll, Please!.......
...
..
.

 Let's EAT!
 Spaghetti (again with the red...)
 In case you are wondering, no these are not homemade.  I went with Rhode's rolls.  Always a sure bet!
 The cursed red punch!
 And my personal favorite...
 Caramel Apple suckers served in a frying pan!
Of course, the caramel apple suckers are in honor Maximus and his love of apples.

Our last activity was to make lanterns.
We just used white paper bags and decorated them up real pretty.
Here's all the kids with their lanterns, giving me their best "smolder".
I forgot to mention earlier that the starting activity was to "Add a few new pictures to my gallery."
That' why there is sidewalk chalk on the wall behind them.
The Birthday Girl's Lantern
In the movie, the lanterns fly, so of course we had to see if ours could!
 If you made it this far (sorry about the long post) you have made it to the crowning glory of any Birthday party...with a little spin.
 I got the idea for the donut tower in lieu of a cake here.
 The birthday girl was awestruck by it. 
 And her little sister was caught trying to snatch a donut hole!
 Chey blew out all four candles (with a little help)
 devoured a whole donut...or maybe two or three
 opened some presents
 and had a moment of pure joy over her new stuffed puppy. 
 Then we said goodbye to all our friends and loved ones with a battery operated tea light for their lanterns (because what's a lantern without some light), and a peanut butter caramel apple with a little note
Sorry there are no pictures of the apples.  I wasn't feeling up to it by that point in the party.
Maybe I'll show you how to make them when I am feeling a little better.
Chey was tickled pink with this party...or maybe that's just the red punch mustache!